Wednesday, December 9, 2009

Buttons, Bows & Brads Class

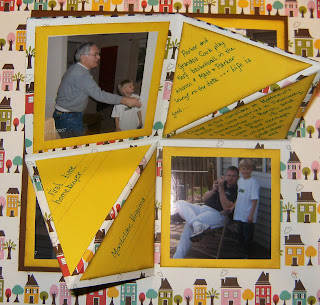
This is my next A.C. Moore workshop targeting beginners to the craft. A Jeannette Lynton design (Close to My Heart founder), I am using this as a design piece for our second beginner's workshop. During this workshop, participants will work with buttons, bows and brads of their preference, discuss various attachment procedures and usage, and complete two pages. Journaling should be prepared in advance. In this case, I typed my notes on vellum and adhered it using vellum tape.

I will bring my Sizzix Big Shot and Shadow dies should participants wish to duplicate my design. Sticker alphabets also work.

The workshop is scheduled for Wednesday evening, December 16 from 6 P.M. to 8 P.M. at A.C. Moore's in Dover, Delaware. Workshop cost is $15.

We will be using some of the following techniques:

· Working from a sketch

· Basic layout

· Titling and Journaling

· Layering

· Embellishing

Layout Materials

q 12 x 12 Base Cardstock (2) I used white as a background.

q 12” x 12” Plain Cardstock (4) I used four different shades of blue

q 8.5” x 11” Vellum (1)

Photo Suggestions

q 7” x 5”

q 4” x 6” (2)

q 4” x 4” (2)

q 6” x 4” (2)

Supplies

q Small Post-it Notes (for labeling your cut pieces)

q Brads, color coordinated with your paper

q Adhesive of choice (Tombows or Dittos are available at AC Moore)

q 4 pieces of 12” x 12” color-coordinated cardstock

q 2 pieces of neutral (white or cream) cardstock to complement colored cardstock

q Vellum for journaling (Journal entry should be prepared prior to class)

q Vellum adhesive (AC Moore has an excellent vellum tape available)

q Brads, color coordinated with your paper

q Letters for titling (If you prefer a different style than in above layout)

q Pop dots

q Needle and thread to coordinate with button

q Mini dots

Journaling

q 7.5” x 2.75” space is recommended. .5” x 2.75” space is recommended. (Vellum is for this)

Equipment

q 12x12 cutter

q Decorative cutting blade – if you want to add a decorative element at the bottom of your journaling column on the left page and the circle on page 2, then you will need a cutting blade for your particular project.

q 12 x 12 self-healing mat

q Ruler

q Scissors

q 2-inch circle punch

q Piercing tool

q Bone folder or embossing tool


Monday, November 30, 2009

Craft Room Creations -- Brittany's First Pages

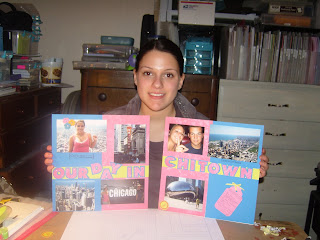
I can't believe that it's the last week of November already! Regardles of the date, it has been a constructive day. I am especailly pleased with Brittany's first visit to my craft room this afternoon. A scrapbooking newbie, she worked with a Sizzix Big Shot using the box letter dies, and the Tags, Scallop Combo # 2 die. She also used Stickle Diamond Ice to add a hit of bling to her title, and learned how to embellish with ribbon and flowers.

Here she is with her two-page spread about her day-trip to Chicago with her fiance (Jeff), her mother and another family member. I think she did a great job with these two pages. I'm sure her fiance will be happy with this special holiday gift, straight from her heart. Don't you?

Thursday, November 5, 2009

The AC Moore Experience

I happy to say that I taught my first workshop at AC Moore yesterday afternoon. I had one student (praise God for small beginnings) so we were able to customize the techniques I planned to teach in my background papers class. Caroline, my student, said she was happy with all that she learned and signed up for a beginner's class in two weeks.

I did learn an important lesson -- never, EVER, test the status of your paper cutter blade with your finger. It may seem dull, but it will cut your finger . . . But I did find out that a Fiskar's Portable Rotary Trimmer that I've had an eye on does indeed have a side ruler. PLUS, it will be harder to cut my finger on it.

Next on my scrapbooking agenda is the DelCastle Holiday Craft Fair, so I need to return to my craft room and get back to work.

Sunday, November 1, 2009

DelCastle Craft Show, Deck the Halls Card


I stumbled across this Fluffles Garland wood-block stamp by Stampendous last year and fell in love with it. Unfortunately, I never had much time to do anything with it, are started designing cards to take to the Delcastle Holiday Craft Show at DelCastle High School next Saturday. I used Close To My Heart Tulip, Chocolate and New England Ivy markers to adhere colors right onto the stamp. After a moistening "huff" I stamped the design onto Areopostale Parchment cardstock (I'm using Up my stash), backed it with brown 8.5"x11" brown cardstock from my stash, and added a sentiment from an old cardmaking set. I colored my little cat and the bulbs with copic makers and blinged it up a bit with Stickles. I also added some pop to the branches with a silver glitter pen.
Stop by our booth at DelCastle Technical High School on Saturday, November 7 to see what more we have created.

DelCastle Craft Show, Equestrian Card

My friend, Melissa Fulgham and I, will be participating in our first craft show this Saturday at DelCastle Technical School, Wilmington, Delaware. I'm excited about some of products I'm debuting.

For years I've been planning on developing a series of equestrian cards and pages for my daughter, so I grab any equestrian (English style) stamps I stumble across. While most of the cards I'll be showcasing at the craft show are Christmas-oriented, I couldn't help myself when I saw a preview debut of this equestrian stamp from Cornish Heritage Farms. I ordered it on Wednesday, the stamp arrived Friday and I spent most of Friday night and Saturday crafting the stamps.

On this card (I have three sets of 5 notecards priced at $20 per set). In this case, I used an ochre 4"x5.5" card base. The second level is Aeropostale parchment cardstock on which I used Boxer Scrapbook Production's English Rider Limited Edition Stamp. These are
smaller than normal stamps and are ideal for inchies or background stamping.

For this background paper, I used the ribbon, dressage horse and "equestrian" word element. I added a bit of bling to the stamped ribbon with a dollop of Stickles. The blue framing is Close to My Heart's Moonstruck cardstock. The top layer stamp is from Cornish Heritage Farm's Saturday Evening Post collection. This is called "Horse and Rider Girl/Lady and was released on October 27th.

After stamping the horse and rider, I experimented with Copic markers, Waterman watercolors, and watercolor pencils to enhance the detail. General Kimberly watercolor pencies 704 Brown and 715 black worked best.

I used three colors in my stamping: Close to My Heart's Chocolate, Vineyard Berry and Moonstruck. I chalked each layer's edges with Moonstruck. I'm pleased with the outcome and plan to experiment more with this stamp.

Check back later for more projects that I'll be featuring at next week's craft show.

Wednesday, October 21, 2009

AC Moore Expand It Class -- More Pix to the Page


While this could certainly be a two-page layout, I chose two one-page layouts with different themes to demonstrate these techniques. Feel free to coordinate or not. The products I used are listed below. You should select products and stamps that support your own designs and tastes.

I am scheduled to teach this workshop at AC Moore in Dover on Wednesday, November 11 from noon to 2 P.M. We will be using some of the following techniques:


  • Booklet Design and Construction
  • Paper Folding
  • Masking/Stenciling
  • Chalking

Layout Materials
To Fly Is To Serve:

  • 3 pieces of cardstock – 2 patterned and one neutral (white or cream)
  • Coordinating ribbon

First Home:

  • 3 pieces of cardstock
  • Country Fair by American Crafts (house print on one side, solid color on the other.
  • Bark PPR 9012
  • Sun Yellow PPR 9081

Photo Suggestions
To Fly Is To Serve

  • 4” x 6” (1)
  • 4” x 5” (1)
  • 4” x 2.75 (5)
  • 1.75” x 2.75” (1) (Optional)
  • 2.75” x 2.75” (1) (Optional)

First Home

  • 3” x 3” (5)

Supplies

  • Stazon Teal Blue Solvent Ink
  • Colorbox Pigment Ink, Chestnut
  • Glue Dots Pop Up Dots
  • Adhesive of choice
  • Archival Fine-tip pen
  • Stamp & Stencils
  • Heidi Grace Everyday Alpha Clear
  • Inkadinkado 9773 Curly Q Alphabet
  • Tim Holtz Mask: Timeworks

Equipment

  • 12x12 cutter
  • Ruler
  • Scissors
  • Stamping blocks

AC Moore's Beginner's 1 Workshop


I'm really excited about teaching these scrapbooking classes at AC Moore's. Beginners' Classes are scheduled at AC Moore's in Dover, Delaware. Participants have their choice of Tuesday, November 10 from 6 P.M. to 8 P.M. or Wednesday, November 18 from noon to 2 P.M.

In this class, I'll be focusing on layout (working from a template), page design/photo placement, titling and journaling. I'm putting together the part 2 workshop now which will touch on embellishments, bling and die cuts.

While I used the following supplies, participants can select papers and color schemes that reflect their project needs. We will, however, be using the above layout. Participants will receive a complete set of instructions at the class.

Layout Materials


  • 12" x 12" Base Cardstock (2) I used chestnut brown from the Starter Palette Cardstock Paper by Nichol
  • 12” x 12” Plain Cardstock (1) I used and ochre sheet from Starter Palette Cardstock Paper by Nichol
  • 12” x 12” Print Paper (2) I used two sheets from Bloom and Grow by My Mind’s Eye

Photo Suggestions

  • 4” x 6” (2)
  • 2” x 2” (9)
  • 4” x 4”
  • 6” x 4” (2)

Supplies

  • Inkssentials Glossy Accent
  • Brads, color coordinated with paper
  • Adhesive of choice. I believe AC Moore carries Tombows and Dittos -- either will do.

Journaling

  • 1” x 5” title: I used a cardstock sticker from the Fresh Paisley Collection by Fashion Folio
  • 4"x4" Cardstock for Journaling (I actually used a 6” x 4” vellum with my journaling typed on the piece)

Equipment

  • 12" x 12" cutter
  • Ruler
  • Scissors
  • Self-healing cutting mat

Sunday, October 11, 2009

AC Moore Background Papers Class


These are samples of a two-page spread featuring hand stamped background papers. In this project's case, I used four pieces of white cardstock to create this layout. I'll be teaching this project at AC Moore's in Dover on Wednesday, November 4, 2009 from noon to 2 P.M.

We will be using some of the following techniques:
  • Random Stamping
  • Faux Suede
  • Generational Stamping
  • Masking
  • Chalking
  • Pouncing

Layout Materials:

  • 12 x 12 White Cardstock (4 sheets)

Photo Suggestions:

  • 4” x 6” (3)
  • 2. 6” x 4” (1)

Supplies:


  • Inkssentials Glossy Accent
  • Color Box Classic Pigment Ink 0813 Provence*
  • Color Box Classic Pigment Ink 08001 Pinwheel*
  • Approximately 2 yards of coordinating ribbon
  • Pop dots
  • Scotch Tape
  • Craft sponge, cut in quarters.
  • Stamp scrubber

Stamp Sets:


  • Hamptons Craft Affair SC0155 Owl Garden**
  • Hamptons Craft Affair SC0151 Easy ABC
  • Inkadinkado 97626 Patterned Bugs**
  • Stampology Clear Stamps Katie Pertiet – Journaling**

Equipment:

  • 12x12 cutter
  • EK Success 3-inch scalloped circle punch or a plain circle punch.
  • EK Success 2-inch scalloped circle punch
  • EK Success corner rounder

    * NOTE: This reflects the color scheme I used; you may certainly select your own. Plan on a three or five-color palate with a corresponding brown for chalking/edging.

    ** NOTE: These are the stamp sets I used. Should you decide to use different stamps, make sure you have a variety of small pieces for background, and larger complementary design and that one of your stamp sets has a tree that measures at least three inches tall.

Monday, October 5, 2009

Great American Scrapbooking Convention

I am so totally excited! Yes I am. I have just uncovered evidence that the Great American Scrapbooking Convention will be in Chantilly, Virginia on June 25-26, 2010! Yes, yes, yes, yes, yes! I'm so excited!

When Opportunity Knocks

I am totally excited about being offered an opportunity to teach at AC Moore's in Dover. I briefly mentioned the opportunity in my CTMH newsletter, but here are a few more details. I will be teaching the following workshops in November and December:

* Creating Background Papers (Wednesday, November 4 from 12 p.m. - 2 p.m.) -- workshop fee is $20.
* Scrapbooking for Beginners, Part 1 (Tuesday, November 10 from 6 p.m. - 8 p.m. or Wednesday, November 18 from 12 p.m. - 2 p.m.) -- workshop fee is $15.
* Scrapbooking for Beginners, Part 2 (Tuesday, December 8 from 6 p.m. - 8 p.m. or Wednesday, December 16, from 12 p.m - 2 p.m.) -- workshop fee is $15.
* More Pictures on the Page: Creating Add-Ons for photos and and journaling (Wednesday, November 11 from 12 p.m - 2 - p.m. or Tuesday, November 17 from 6 p.m. - 8 p.m.) -- workshop fee is $20.

I'm working on the workshop details now and will be posting them, with photos, the week of October 19th or sooner.

Monday, September 21, 2009

I finished it! Page 1


The cover of the Trinidad Scrapbook is a collage of the photos left after I finished the 19 other album pages. The lettering is made of cranberry cardstock which I cut out using my Making Memories Slice. I don't remember which disk I used, but it worked well, don't you think?

I finished it! Pages 2 & 3


These two pages were copied from a July blog entry. The entire scrapbook was constructed using Close to My Heart's Moon Doggie papers and coordinating stamps. The content is a reflection of our "abode" during our stay in Trinidad & Tobago in 2005.

I finished it! Pages 4 & 5


This too was copied from a previous entry in July. It features our our stop at a scenic overlook between Port of Spain and Vistabella.

I finished it! Pages 6 & 7


I copied this page from a previous blog. This features our storytelling activities in Trinidad & Tobago in 2005. Check July 14th entry for details

I finished it! Page 8&9


I copied these two pages from another blog entry so I can have the whole scrapbook together. This is from our first trip tto Trinidad & Tobago in 2005. We were tremendously overfed during our two week stay there at that time.

I finished it! Page 10


Though this has a markedly different appearance than the other Moon Doggie pages, this layout showcases efforts to prepare for Joan Sandassie's memorial service in May 2006. The technique is one that I learned at the Great American Scrapbooking Convention in Chantilly, Va earlier this year.

I finished it! Page 11


While 2006 is designated on page 11, it also extends to page 10. This reflects only one of two trips I made to Trinidad & Tobago next year. On this page, Kathryn (below left) went on to be with the Lord in 2009. Prior to that she testified about a miraculous healing which the Lord granted through Pastor Joan and David Sumari (if I remember correctly. Above left, Diane enjoys the friendship of Peggy Lalchan (on the right) and her close friend whose name escapes me. Bottom right, Brandon (whose wearing the hat) joins in drill ceremonies at his school's field day.

I finished it! Page 12


Fellowship is at the heart of our visits to Trinidad & Tobago . . . In this case, our youth bonded with their new friends in Trinidad & Tobago. First, we see Kia and Samantha. To the right, we see Michael atnd the girls bonding with the all-male youth group that gathers in the Great Commission Victory Tabernacle. Below left, Michael shows his appreciation of the kitchen patrol -- Auntie Pearl and Pamela. In the center bottom, David relaxes while Diane and Jane take a moment to lol -- laugh out loud.

I finished it! Page 13


Tracy Sandassi and Jane Benton are shown in the the top photo. Location: kitchen in the apartment above the church. Of course, I'm on the left in photo/video mode. Bottom right, Kia and Samantha having lunch at a local mall. Upper right is Brandon Sandassie. Fellowship plays an important part of our role in Trinidad.

I finished it! Page 14


This page commemorates the contribution of our girls who so effectively led dance, mime and all sorts of other activities. It was only when we brought our youth that I learned of the use of local phrases like, "don't you be vexin' me now" and "we've been limein' down the street."

I finished it! Page 15


Young and old alike, our girls were quite the workers. They added a punch to the program that is essential to good drama and dramatic interpretation. PLUS they had fun! What can be better than this?

I finished it! Page 16

The young men who comprised the Trinidad youth were awesome. Not only mannerly and helpful, they were willing to try new things; and there was no shortage of new things to put their hand to. Our kids had a ball, and I think they did as well. Friendships were formed in a memorable trip for all.

I finished it! Page 17


The show is over, so the boys decided it was time to jam. Michael told me that he wasn't used to being around so many Christian youth around his own age.

I finished it! Page 18

While we had a wonderful time in Trinidad and Tobago, our trip took an extra turn by three days in Grenada (Brandon pointed out that I misspelled the country name. This is the West Indies, not Spain). We stayed at a local hotel and one of the church ladies prepared our meals. We started each day with fish. It was different, but tasty.

I finished it! Page 19

This is page two of our Grenada trip. We had trouble conveying the concept of dowel rods, so I agreed to bamboo about the diameter of a broom handle. Their broom handles must be pretty big. The were also a bit long, so Michael Sandassie cut the bamboo in half and the worked out well. The sound they made was awesome. Our teens did most of the teaching and the kids were awesome.

I finished it! Last page


This is the last page of our Trinidad Scrapbook. A celebrity siting in the Port of Spain airport led to a chance meeting of Yolanda Adams in the customs line in Houston. She graciously agreed to have her picture taken with our teens.


Wednesday, September 2, 2009

50-Card Christmas Workshop


When I saw these cards on one of the Close To My Heart (CTMH) bulletin boards and realized that you could make 50 cards from half a level 2 paper pack, I knew this was an incredible holiday workshop. Unlike the one I saw, I've added a few extra elements to the project. Instead of two basic stamp sets, I used four. Instead of 4" x 5.5" cards, I purchased quality card bases at 4.5" x 5.5 inches. So I created a "ribbon" effect by adding a half-inch strip and crimping it. In the first set of four cards you see, I used CTMH's Angel Sent cards featuring for sweet cherubs (A1099). Visit my website at http://dianecook.myctmy.com for more art. I'll be posting more later today or tomorrow. My workshop is at my home and is slated for Saturday, October 3 from 9 AM to 5 PM. Sign-up deadline is September 15, 2009. For more details, email me at dcookwrites@cookworkshop.com and I'll add you to my newsletter mailing list.

Wednesday, August 19, 2009

50-Card Workshop


Above are some examples of an October 3rd workshop that I plan to teach during which we will make 50 Christmas Cards from 1/2 a level 2 paper pack day-long session. This is my first pass which takes a bit longer than it should because I did a lot of detailing. I will try it again next week to work faster and more efficiently.


Awesome Albums


These two albums brought me into the home stretch at CKC (I signed up for seven workshops in one day) I was surprised that I wasn't totally brain dead by the end. Does that mean that I'm getting better? Of course, I filled the 5"x7" files with pictures of Baby Brayden . . . now I need to add Brayden's big brother, Parker, into the mix. I'm working on his whole, entire, just only him scrapbook.


While I haven't included all the workshops and scrapbooking pages, I have presented a good representation of this most efficient approach to CKC. My travelmate, Melissa Fulgham, wants us to add the late night crop event to the weekend, but we'll have to wait and see. I already have one other major convention on my calendar (in June 2010, I think) and I would love to return to the Great American Scrapbooking Convention in Chantilly again. However, with the demise of Memory Makers Scrapbooking Magazine, I don't know what that does to the convention.

Regardless, I've thoroughly enjoyed the learning experiences that the convetions provided this year. What a blessing.


This, too, was from the CKC Convention in Valley Forge on August 1st. This was mad from a 4"x6" accordian album demonstrating various ways to use file folder made to fit. it was a very good workshop that that emphasized using a variety of techniquest to achieve the goals. I have not added photos to this one yet, but with all the playing the Brayden is doing, I plan on filling it soon and sending it as a gift to someone special.

Age of Discovery, Part 1


The beauty of babyhood is that every day brings a new discovery. This class was "One Stamp, Ten Techniques. Of course, it screamed for more baby pictures so I used pictures of Brayden to fill the bill. I particularly enjoyed stamping a tree on two different papers and incorporating them into one in design (see "Age of" page). I also enjoyed stamping the owls on printed paper (see Discovery page), which is a new/different application for me. I'll most certainly be adapting these two techniques ot Close to My Heart. And, of course, isn't my practically perfect grandbaby absolutely adorable?


Baby Faces


This is one of my favorite layouts from the CKC conference I attended on August 1 in Valley Forge, PA. The layout is from the Basic Grey workshop. I used eight 2"x 2" photos of my grandbaby, Brayden. All these photos were taken the week after the convention (I generally take more than 100 each time I visit, and we try to visit once a month. He's 10 months old here. I added the title "baby faces" with the Close To My Heart Chocolate Alphabet, large (E1010) and Twilight exclusive ink. I used the Classmate Alphabet (D1303) to stamp his name and age at the bottom of the page. I'm looking forward to adapting this layout to our Close To My Heart papers.

Monday, July 20, 2009

Travel Workshop Report

One of the greatest joys of scrapbooking is sharing, and that was proven at our first travel crop on Saturday, July 18. It was so successful that we're going to do it again on Saturday, August 29th. Here Dawn Johnson, Melissa Fulgham's sister, holds up her last 2-page layout. New to scrapbooking, Dawn actually completed six pages chronicling her June vacation to South Dakota during her first scrapbooking round.

"When Melissa told me I would get four to six pages done today, I thought she was wrong," Dawn said. "How long does it take to put a few pictures on a page?" But Dawn soon discovered that this art form is about telling your story with pictures, paper, journaling . . . and that it's a bit addictive.

Dawn effectively incorporated maps and memorabalia into her design . . . and has committed to attend our August workshop. The rest of her designs are below: