Saturday, November 26, 2011

My Cricut Catalog

I've not added to this blog for awhile because I haven't been sure about how to proceed, until now. If you haven't had a chance to visit my  website (www.scrappigators.com) then take a few minutes and see what we're up to. It's still far from finished, but it's along well enough to grasp our concept. I'm posting most of my "finished" projects on my scrappigators.blogspot.com blog. I double posted for awhile, but I didn't think that was the best use of this particular resource.

Today, two days after Thanksgiving 2012, I got an idea that speaks more into the notion of "our scrapping life" that what I'm doing on scrappigators.blogsport. com. It has to do with the process of life that we as scrapbookers and cardmakers experience as we seek to express our art on paper. More specifically, it has to do with the nuts and bolts issues like organization, storage, product and project management.

Now, I really like my Cricut, a lot . . . but it is a pretty expensive toy just for lettering. As a Paper Ed instructor at Michaels in Dover and Rehoboth, I'm pretty much expected to teach Cricut classes in our ever-growing classroom menu. That said, I'm pretty much ready to take my Cricut usage to the next level. Now that holiday sales are ramping up, I'm desparately trying to resist temptation by rquiring myself to use what I have before I add another new "thing" to my Cricut cartridge collection (I have close to 50 cartridges which translates to maybe 2,000 images or more). The real shame is that I haven't done anything with most of my collection. That's where the proiect part comes in.

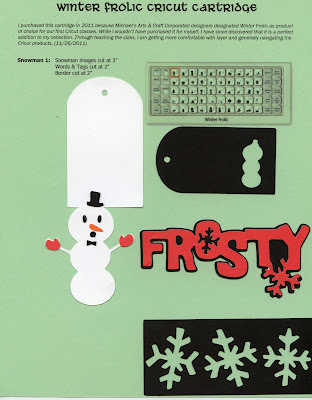
To familiarize myself with the Cricut process, I started creating a "catalog" of machine-generated images to adhere to a page that I will punch and attach into a Rollabind  notebook, Those that I turn into actual projects will be listed on scrappigators.blogspot.com. But each image that I use in a project will also find its way into my "Cricut catalog" along with future reference images for up and coming projects.

My first included image is "Frosty" (see  below) which is found page 28 in the Winter Frolic handbook. I also downloaded the electronic version of the handbook onto my server as well as the overlay. If I add three or four images a month, I'll be doing well. Ideally I would finish one cartridge before starting another, but this is far from an ideal world. I will keep you posted via this blog.
Monday, October 3, 2011

Copic Whimsies

I thoroughly enjoyed teaching my first Copic class at Michaels last month and I am looking forward to the next session. As I develop new project, I find myself drifting away from my original concept of Lessons 1-2-3-4 etc and moving towards titling by type. I suppose I could have called cute little cards bugsies, but since I don't like insects that much, whimsicals or "whimsies" suits me a bit better. I try to focus on three techniques in each workshop. In this case my targets are  Palette Blending, Colorless Blender Techniques and of course basic blending. The  . There is sufficent coloring space to practice in and they are totally cute even to a non-bug-lover like me. I also decided to use one layout to create three different "looks".  Here are the additonal products I used to make these cards:
COPICS:
  • Colorless Blender
  •   B05 Process Blue
  • BG18 Teal Blue
  • E37 Sepia
  • YR00 Powder Pink
SUPPLIES:
  • Naval Orange Bazzill Stock Cardstock
  • Navy Blue Cardstock
  • Recollections Pastel Printed Cardstock, 8 ½” x 11"
  • Recollections Foam Adhesive Circles, ½” 
  • Recollections Iridescent Adhesive Rhinestones
  • Alcohol-free Baby Wipes
  • Adhesive
TOOLS:
  • Recollections “Don’t Bug Me” Clear Stamps
  • StazOn Teal Blue Solvent Ink Pad\
  • Potter’s Clay Memento Ink (Dew Drop Collection)
  • Tuxedo Black Memento Ink
  • Recollections “XXX” Border Punch Item
  • Martha Stewart Button Punch
  • Scoring Board and Bone Folder

Sunday, September 25, 2011

A Bit of Vintage: The Times of My Life

Fashion may call it "vintage", but I call it my history. Last week I completed a two-page layout using Graphic 45 Communique and Romantique papers which revisits our most unusual wedding day. At the time, I was more focused on the marriage than the wedding. I prepared this page from an historical perspective (36 years after the event). My title is a "Memories" stamp from Heartfelt Creations that I received as part of class I took at CKC Valley Forge in August. I colored the flowers in the stamp with Copic markers. This layout is one of about 12 in a scrapbook I'm building titled The Times of My Life.

Wednesday, September 21, 2011

Change of Plans

I am totally excited about my Copic Class at Clare's. After conducting a customer poll, we discovered that a Copic card class would be a bit more appealing than a scrapbooking one, so we're doing two cards with four images. I changed up the colors so my students would have some greens for their Christmas card-projects between now and holidays' end. I used two colors here -- G21 Lime Green and G24 Willow on this card and B93 Green Gray and RV21 Light Pink on the next one. I also took advantage of Michael's big sale last week and purchased 24 sheetsof K&Company's Addison Collage paper for about 16 cents a piece. As with the my scrapbook page project, I'm using flowers from Sparkle N Sprinkle's Blossoms Stamp Set #429. My black-glittered buttons are from Recollections which I purchased from Michaels. My class at Clare's Keepsakes is October 12 at 1 PM. The $25 fee includes everything but the markers, adhesives, and cardmaking tools. The kit contents are cut and loaded with everything but the directions. How exciting is that? 


Tuesday, September 6, 2011

Copic Classes at Clare's, Session 1

I had a wonderful time meeting with Clare at Clare's Keepsakes and Scrapbooking Cove in Bethany Beach, Delaware several weeks ago. I will be teaching scrapbooking and Copic classes there in October. I'm really excited about the  Copic project because I'll be incorporating the art into scrapbook page designs. I decided that 8"x8" scrapbook pages will work well for our Copic-centered projects. I structure my classes to introduce about four new colors every month. This allows my students to gradually add to their Copic collection In this project I used YR02, R12, R14, and BG05 to color two flowers from Sparkle N Sprinkle's Blossoms Stamp Set #429. I built the pages with discontinued Close to My Heart (CTMH) papers and two CTMH Cardstock Papers -- Pacifica and Cocoa. I used my Plantin Schoolbook alphabet (1 1/4 ") to cut out "PATHS" from Recollections Cream cardstock. I took the photo the day I received my new Canon Rebel, a digital SLR. My friend, Melissa, says I should call this the "calm before the storm" because I took the shot shortly before Hurricane Irene dumped on Delaware. My first Copic class at Clare's is scheduled for Wednesday, October 12 at 1  PM.

Monday, August 15, 2011

Almost There

With the summer vacation season winding down, I can happily tell you that I'm ready for a heavy-duty scrapbooking and cardmaking season this fall and winter. But the Michaels folks are keeping me busy preparing for a full and active teaching schedule for all our students who have been asking for more. Finally! More is here! Besides offering both morning and evening Spotted Canary Classes in Dover and Rehoboth I'll be teaching two Paper Education classes, one Martha Stewart class, and one Copic Class. Since my CKC students at CKC Valley Forge enjoyed the Punch Around the Page aspect of my Convention Pages class, I decided to start with the Martha Stewart classes. Now, my CKC students only got one piece of the PATP pie -- but for $10 and the price of a kit at Michaels, we will finish four cards in our two-hour session. But best of all, there's plenty of product left to make your cards or scrapbooking pages using your fresh new tecniques. I'll be offering the PATP classes in Michaels both in Rehoboth and Dover, Delaware. My Rehoboth classes will be on Monday, September 12th from 4:00 PM to 6:00 PM and Wednesday, September 14th from 1:00 PM to 3:00 PM. In Dover, I'll be teaching the classes on Tuesday, September 13 from 4:00 PM to 6:00 PM and on Thursday, September 15 from 1:00 PM to 3:00 PM. We must have a minimum enrollment of four people in the class and our enrollment deadline is 24 hours before the class begins. This is a great technique to add Pazzaz to your cards and pages for the upcoming holiday season. By the way, if you live in the Rehoboth/Dover area, I  hope we'll see you at Michaels. Be sure to stop by for our Meet the Teachers Day on Saturday, September 10 from 1:00 PM to 3:00 PM.
 

Thursday, July 14, 2011

I’m totally excited about teaching at CKC Valley Forge and CKC Charlotte this summer. I was chatting with Stacy at the Buffalo convention and she suggested that I share a bit about my class – Picture Perfect Convention Pages. It’s a technique-driven workshop that uses a pocket-filled layout with inventive ways to use 15 4”x6” pictures or more. The best part is that all you’ll need to do is add the photos when you get home. You’ll have your choice between an inchies or collage punch-around-the-age project as well as an accordion mini-book, tags, folders masking, stamping and more. All these are wrapped into two compact 12”x12” pages! I hope to see you at the convention. Diane Cook (www.scrappigators.com)